1/23/22 -

Please support me and other Lost Ark veterans like Perciculum, Reitear, Choilicious, Saintone, and Starlast who have been playing the game since Korea OBT in 2018 by clicking this website.

https://lost-ark.maxroll.gg 


Build Guides, Resources, News and Raid Guides for Lost Ark - Maxroll.gg

Maxroll covers Raid, Island, Character Leveling, Adventure Tome, Abyssal Dungeon and Build Guides, News, Collectibles, Tools and Tier Lists for Lost Ark.

lost-ark.maxroll.gg

5/1/21 - Another person Ryu#7272 has created another website called


>>>>>>>>>>>>>>>> https://papunika.com <<<<<<<<<<<<<<<<<<


It's a much cleaner version of infolao. If I ever decide to add or change anything, it's going to be on that site.


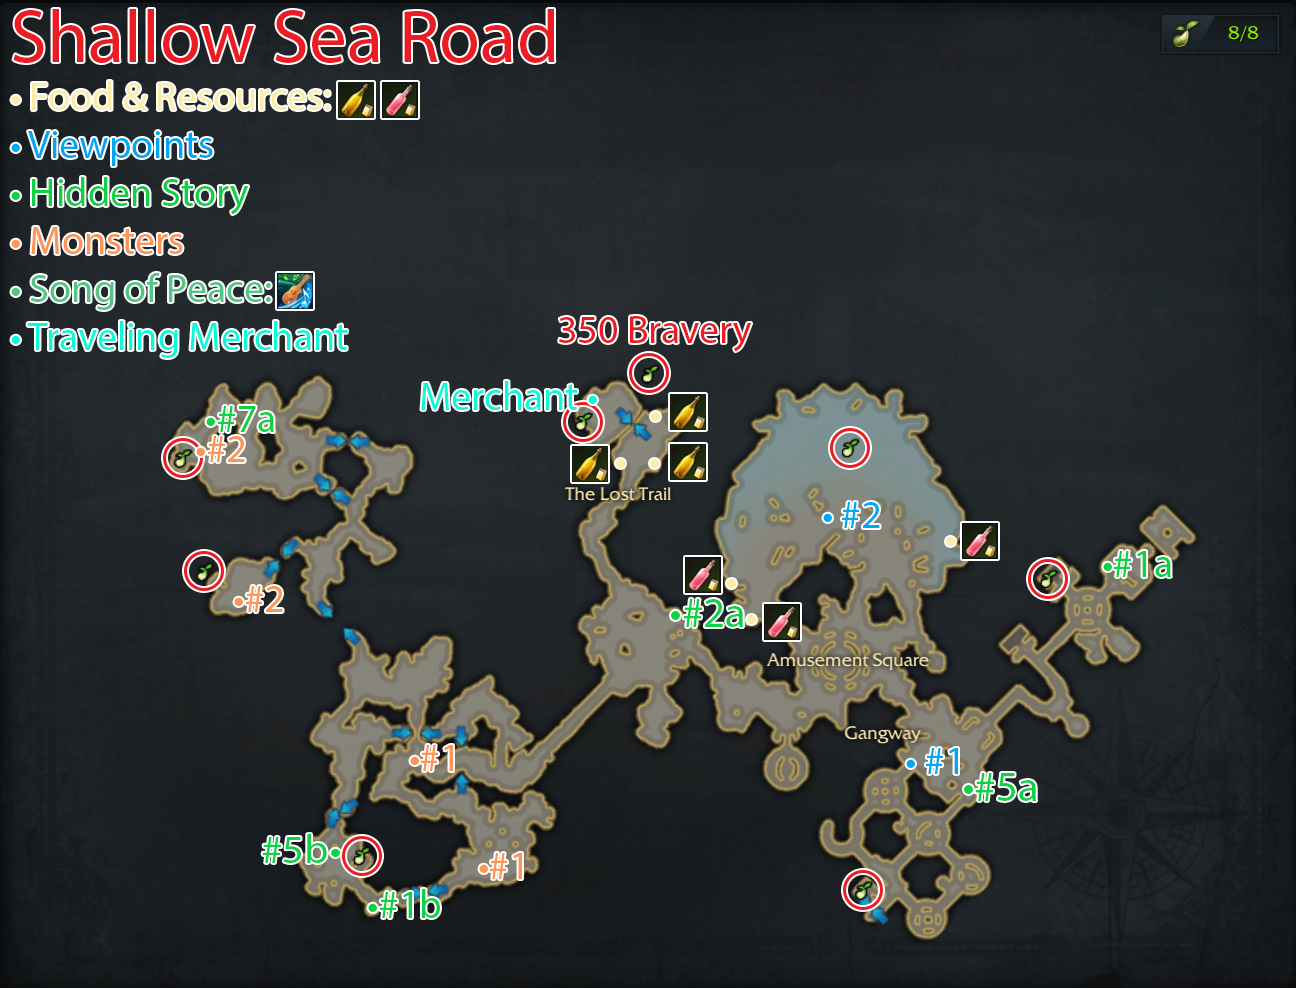
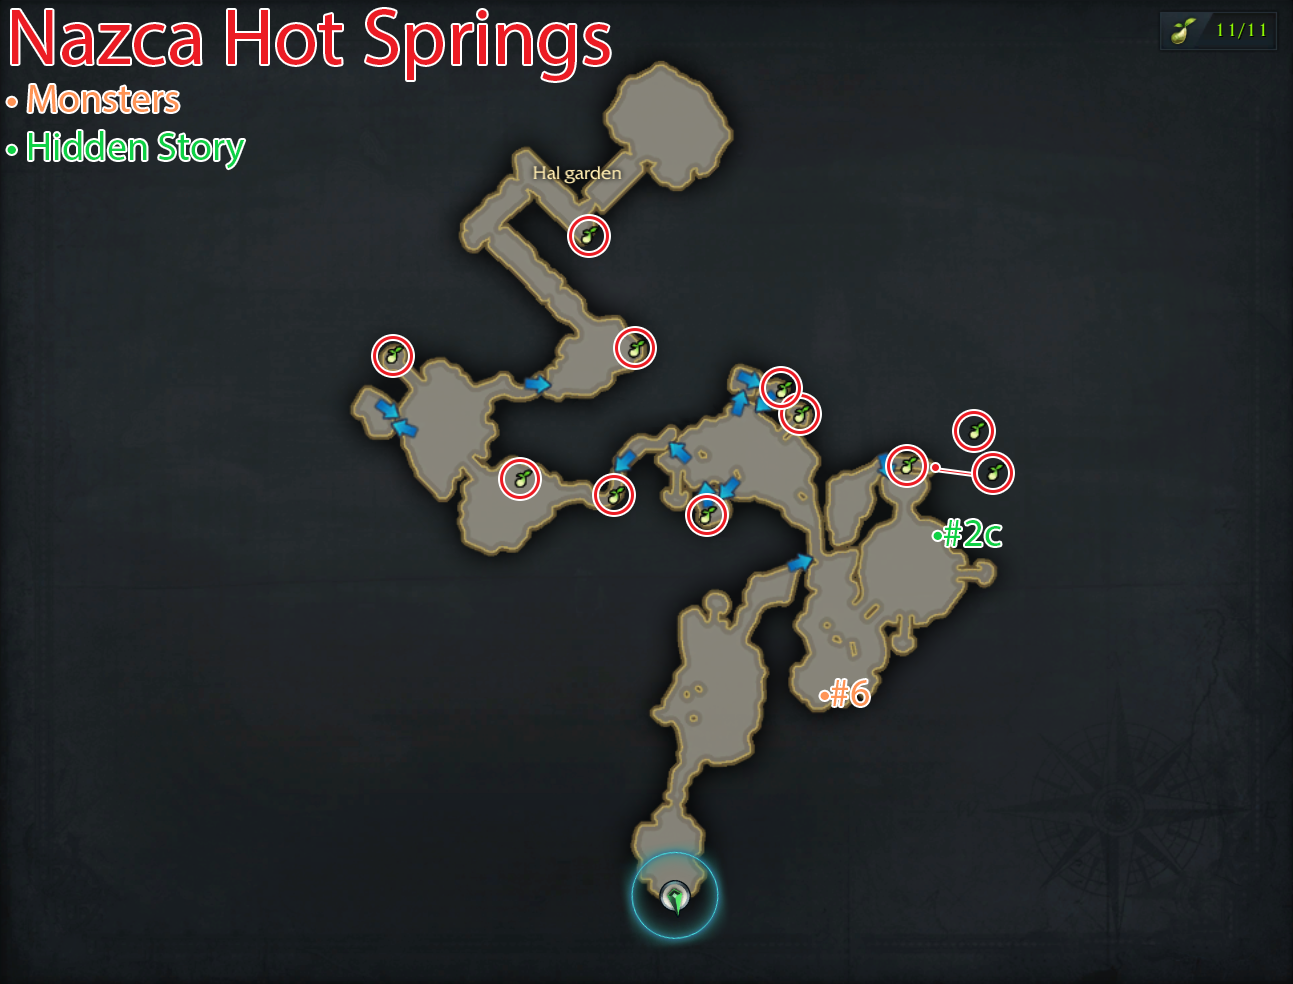
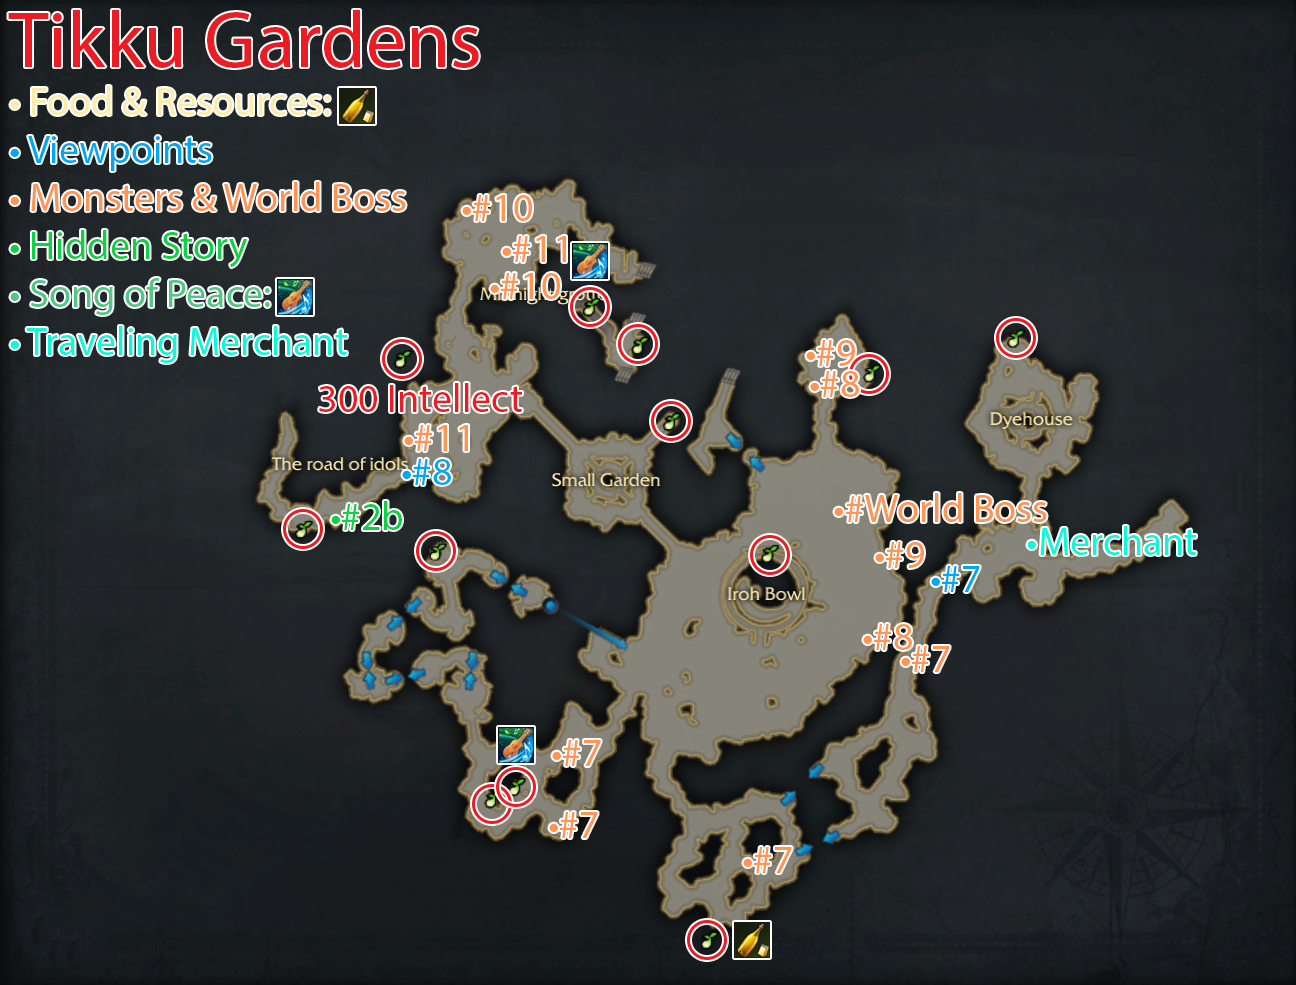
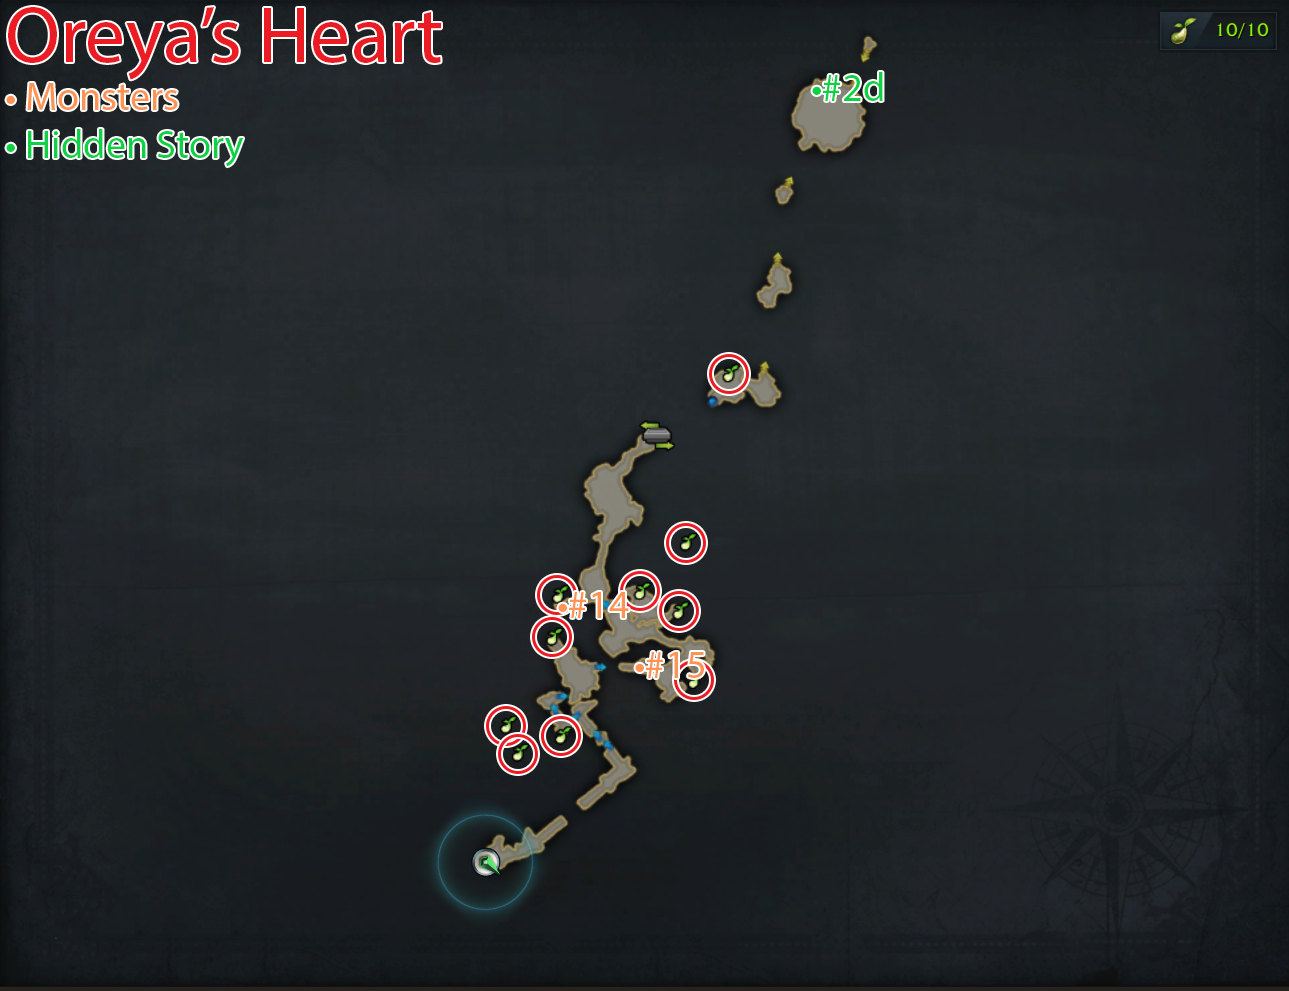
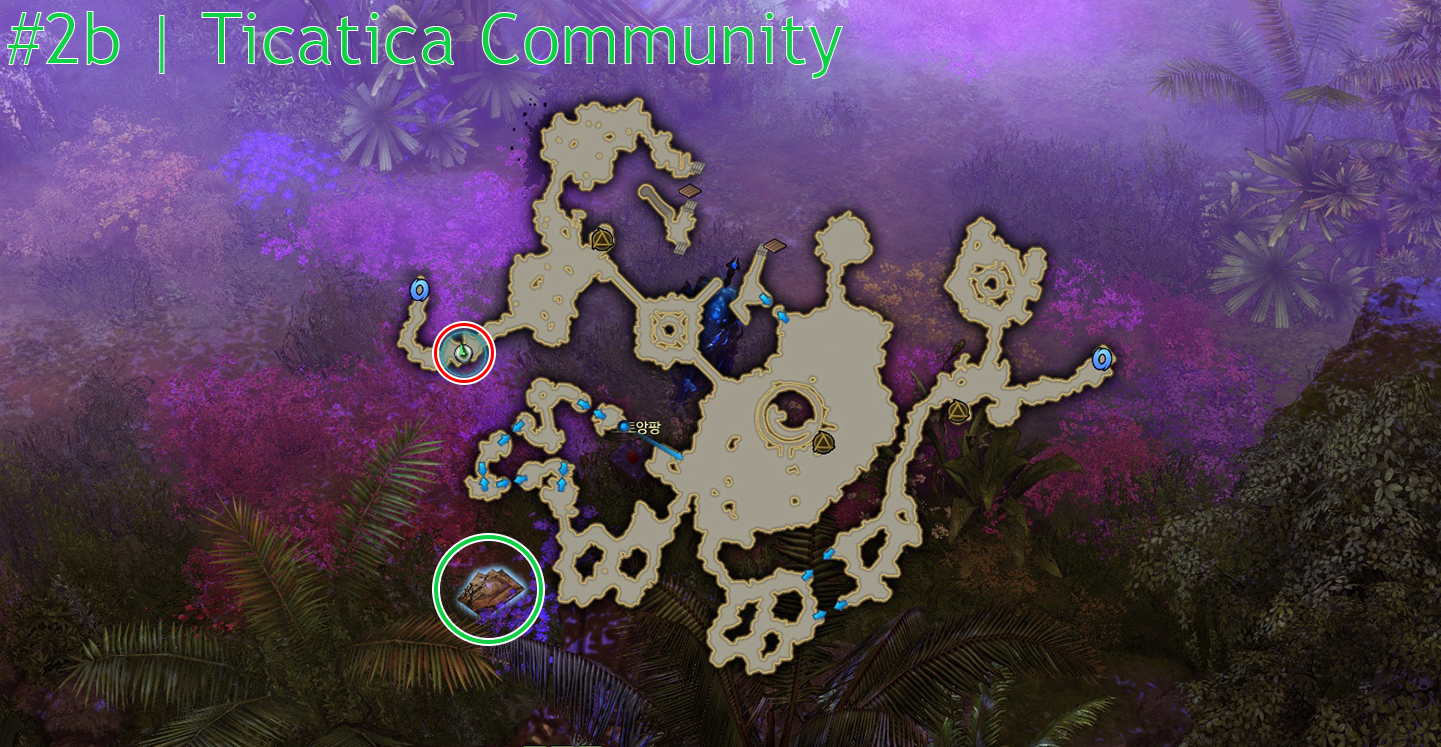
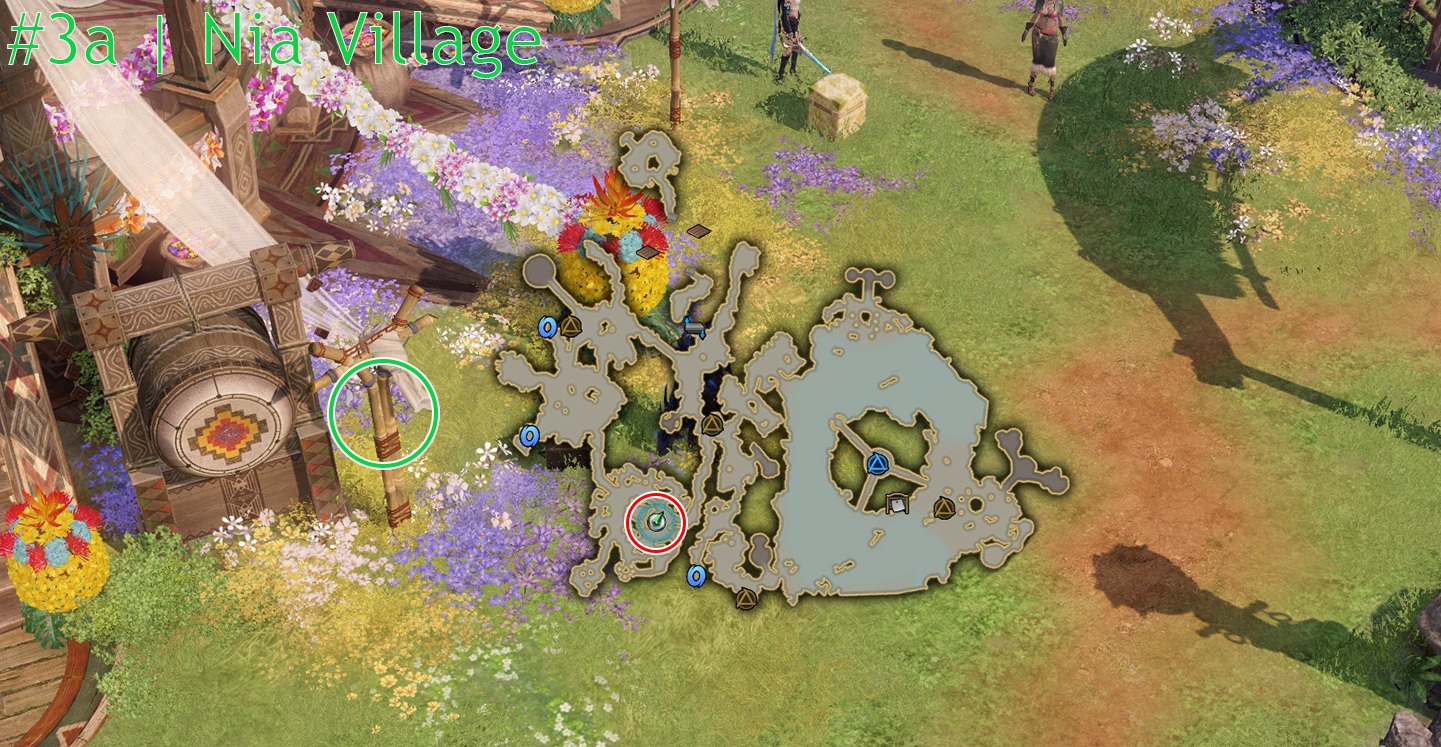
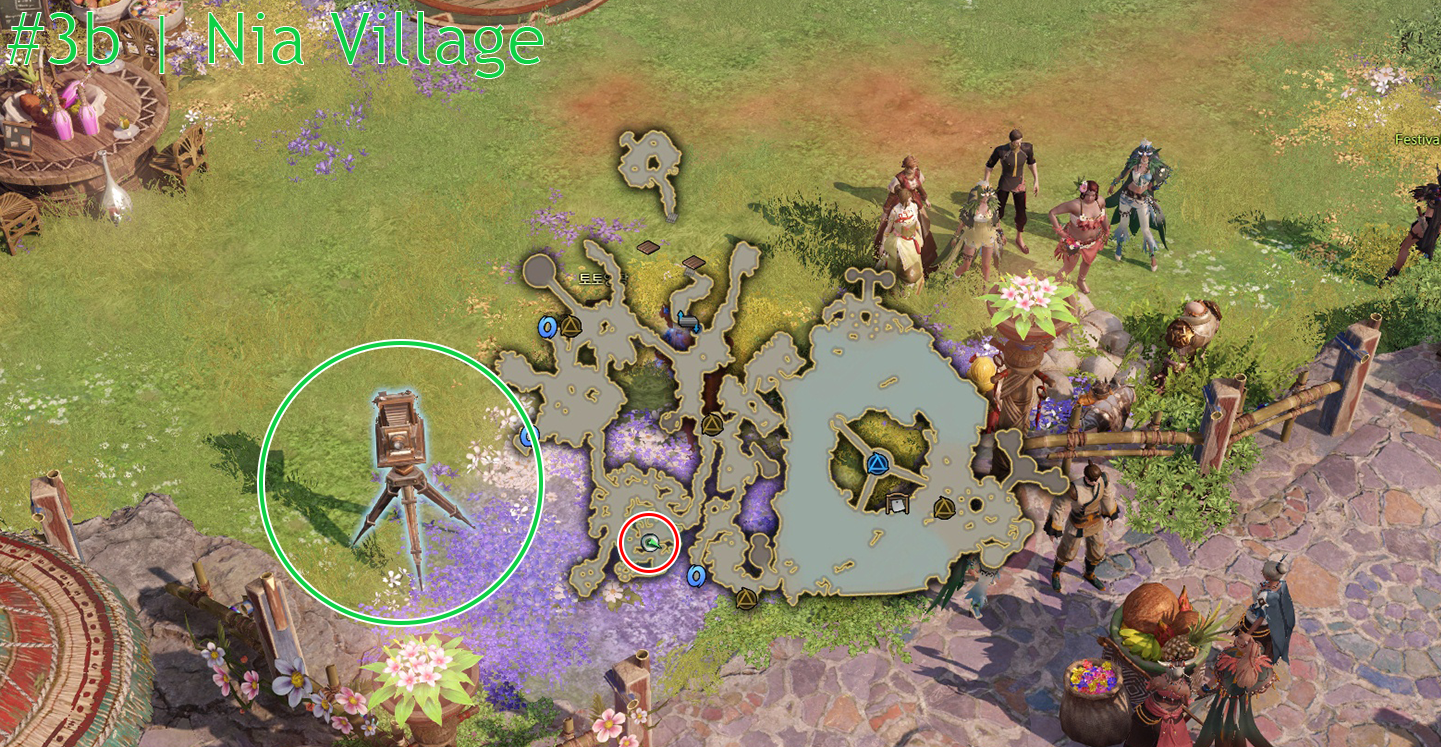
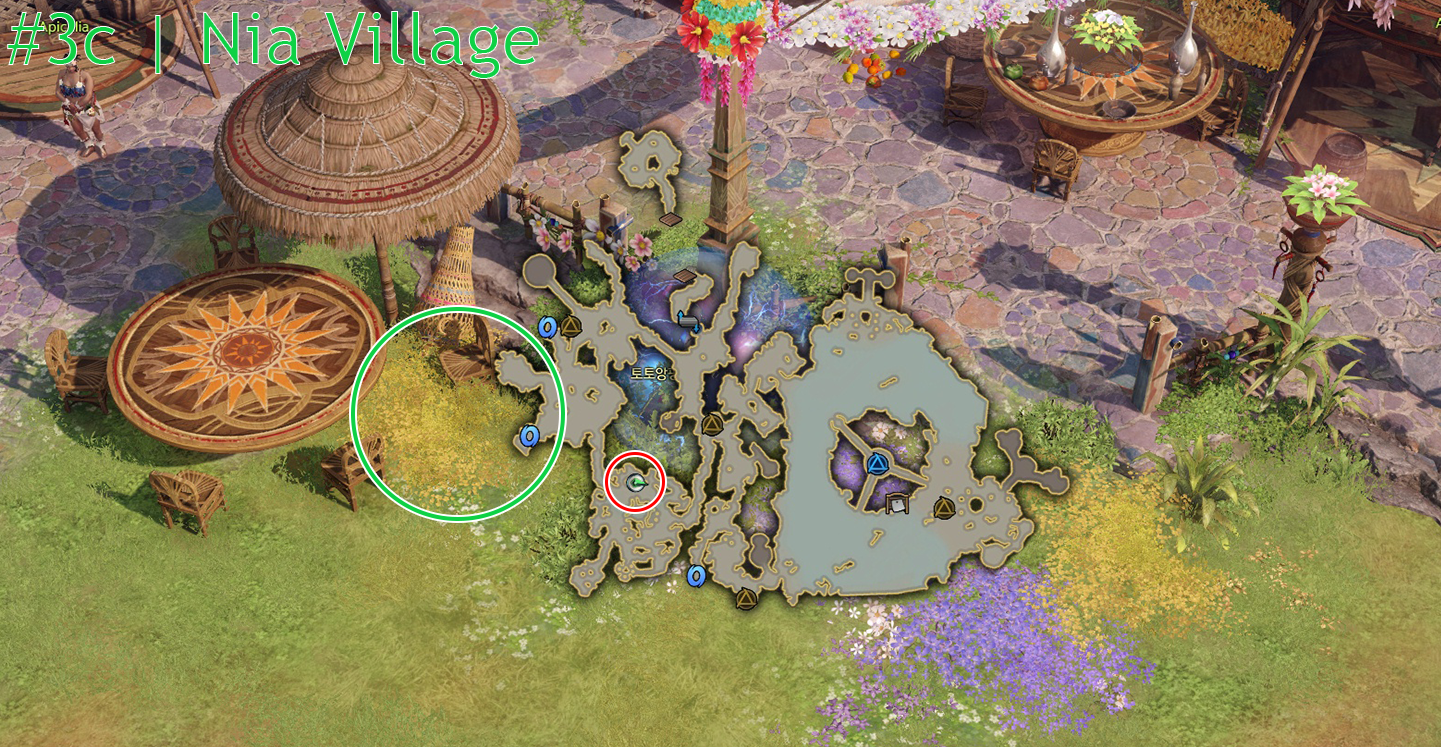
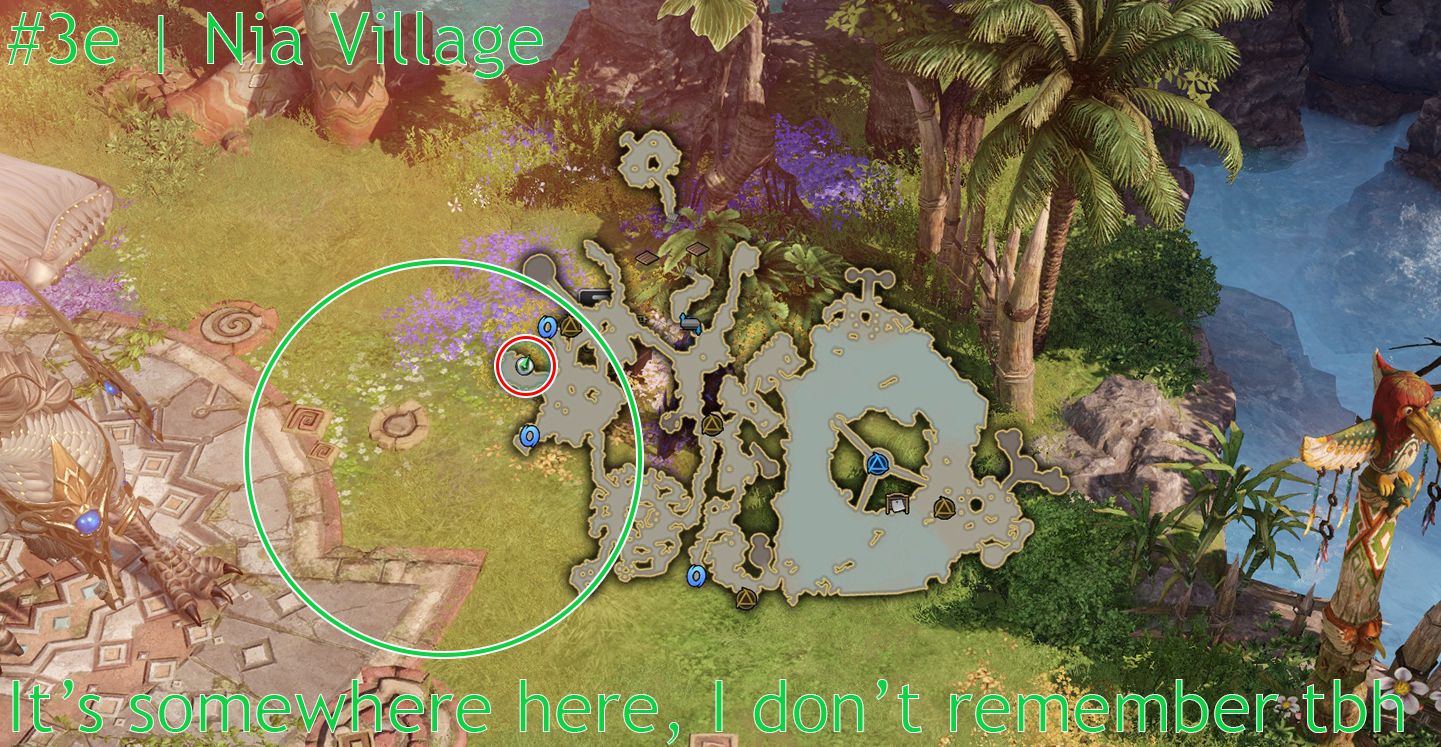
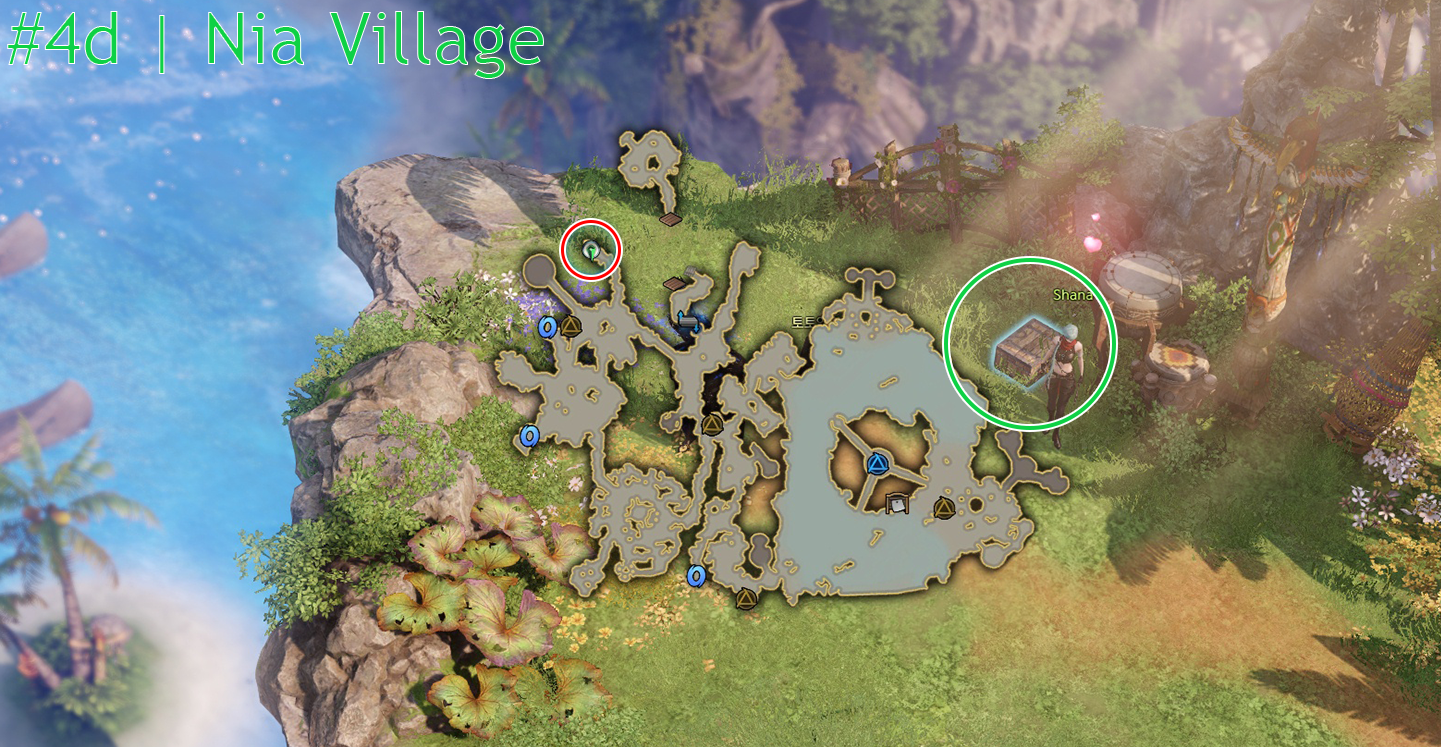
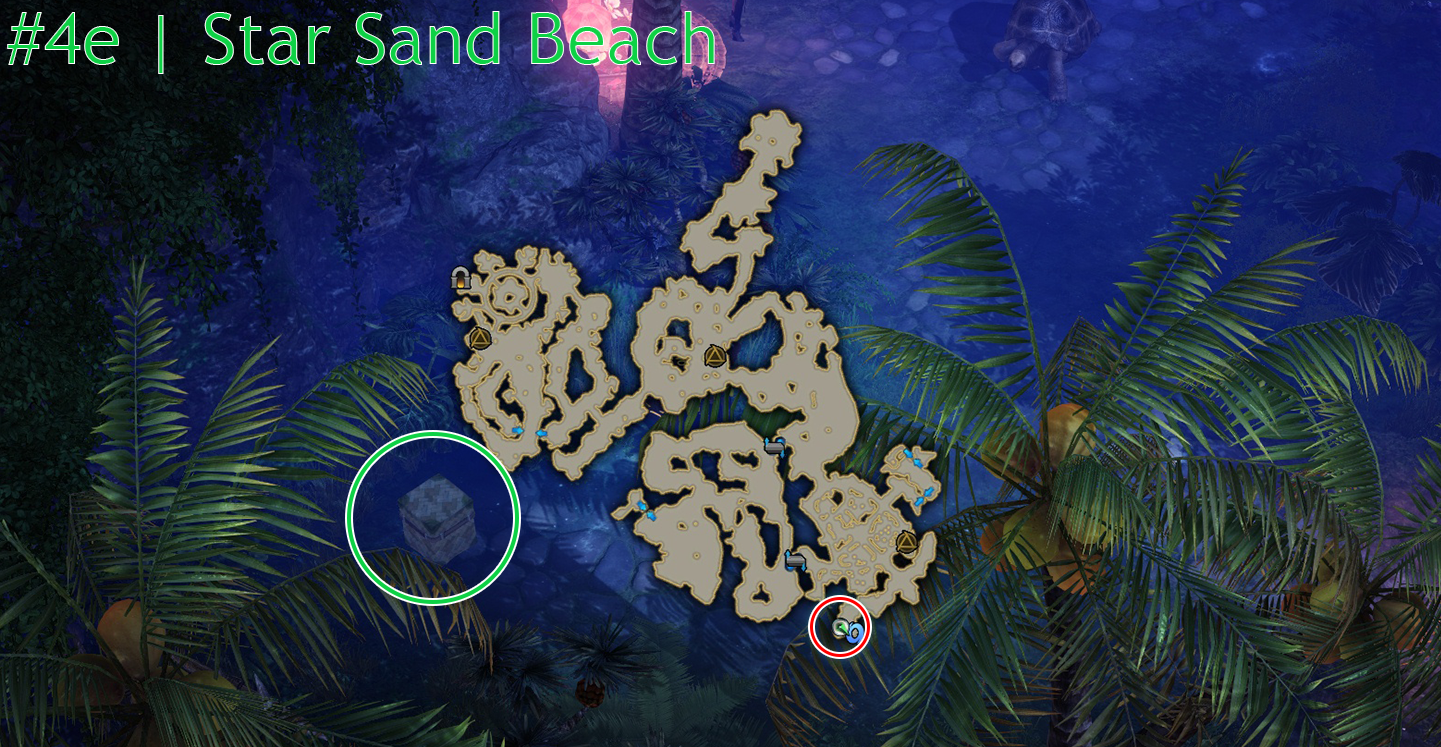
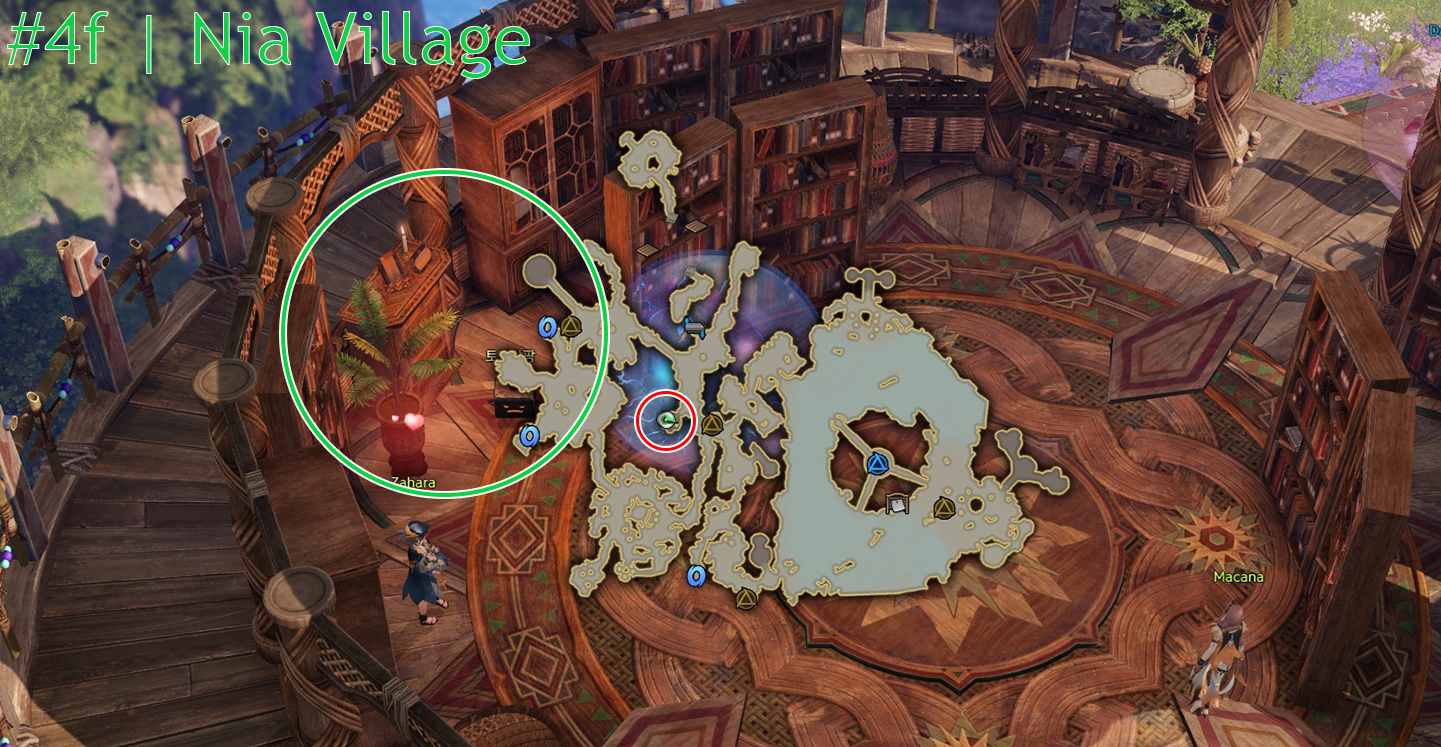
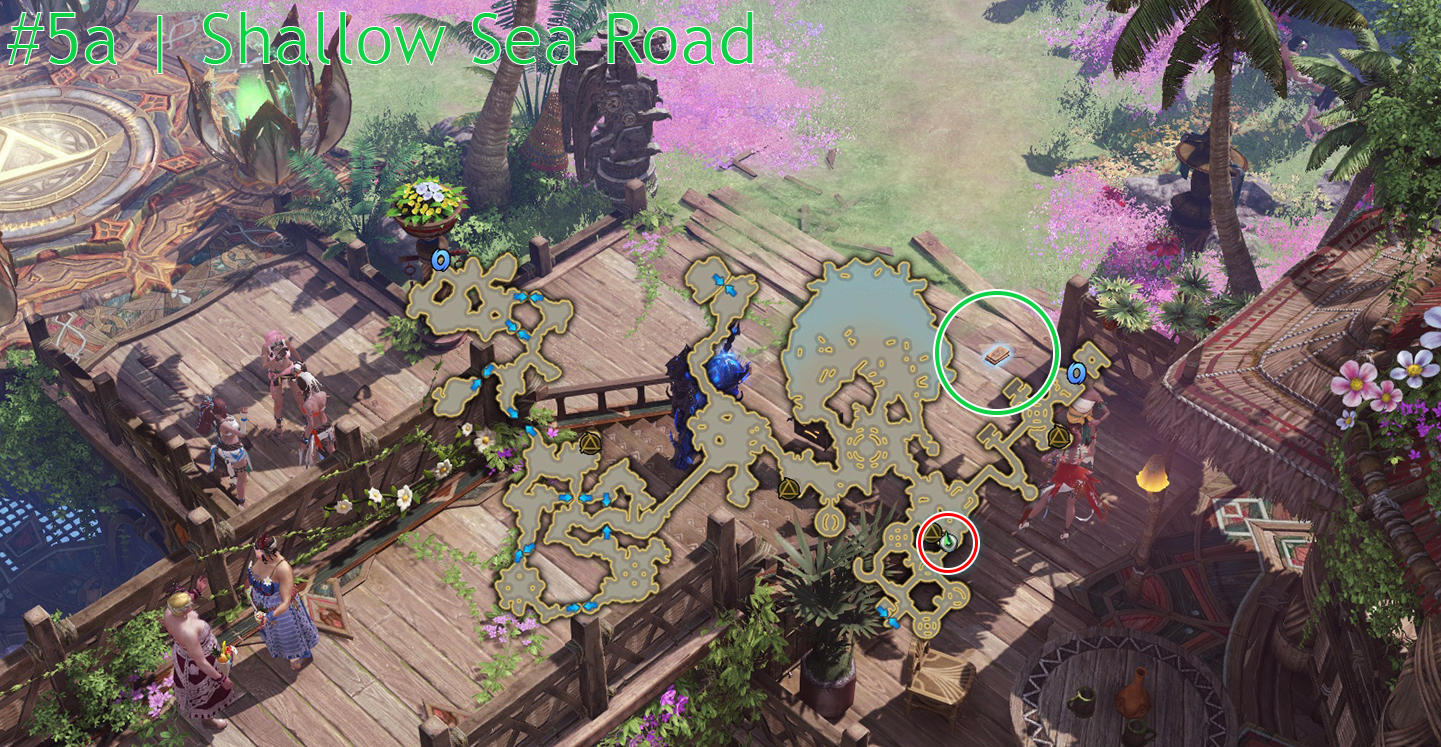
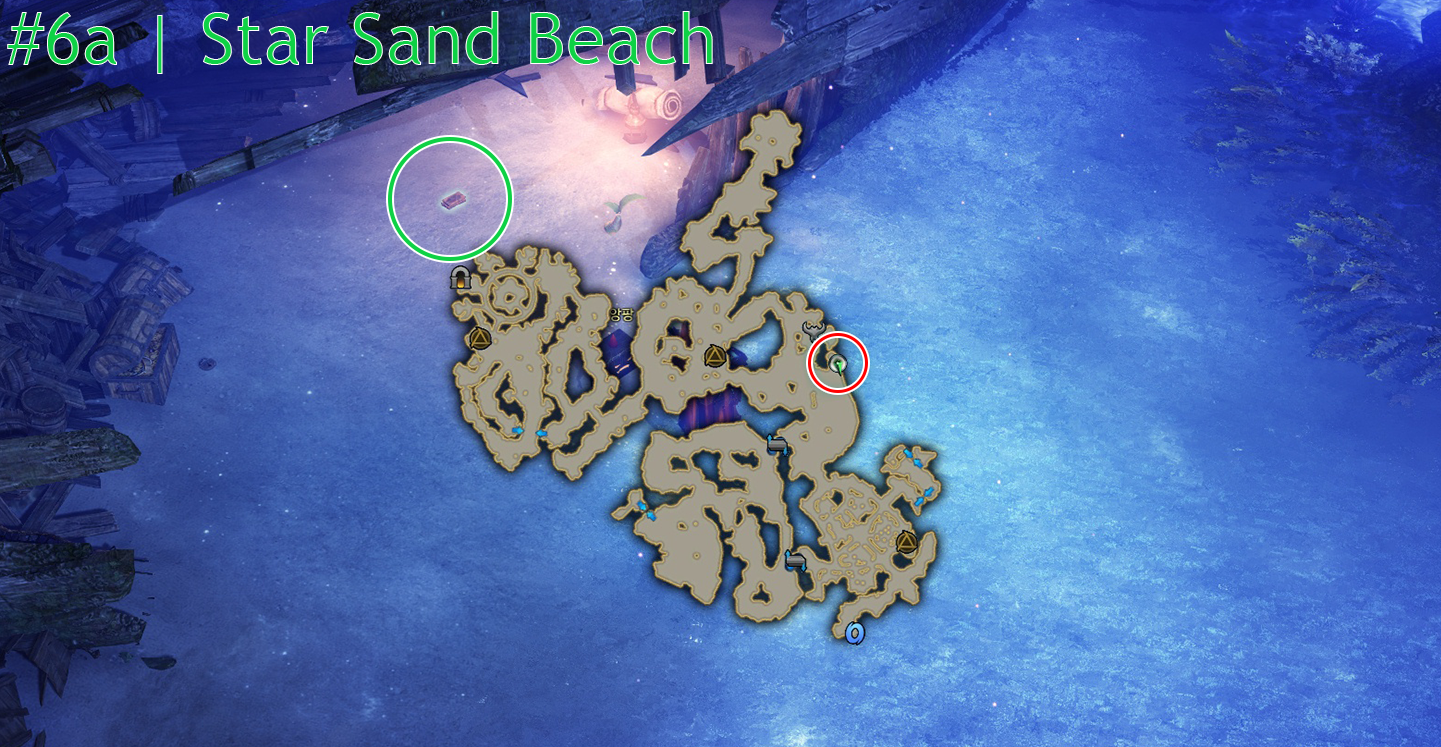
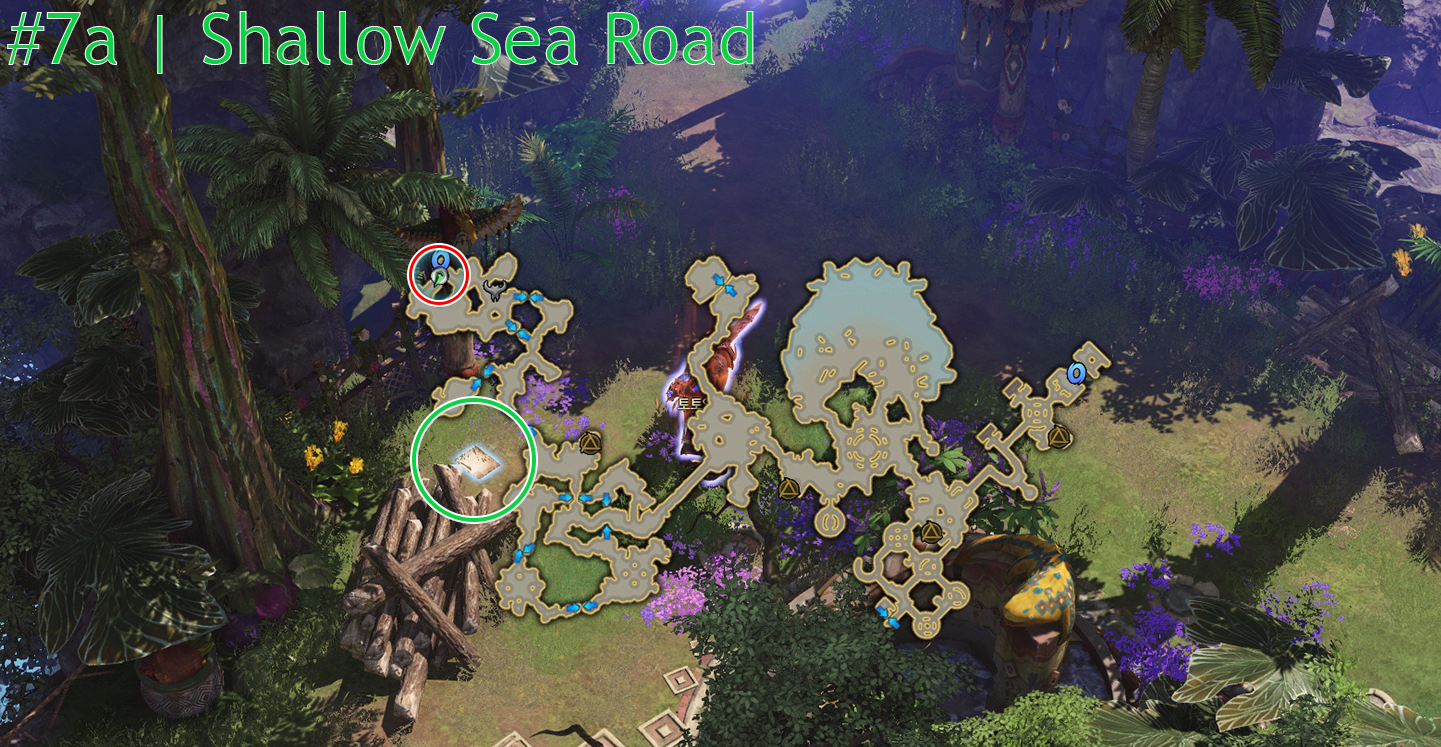
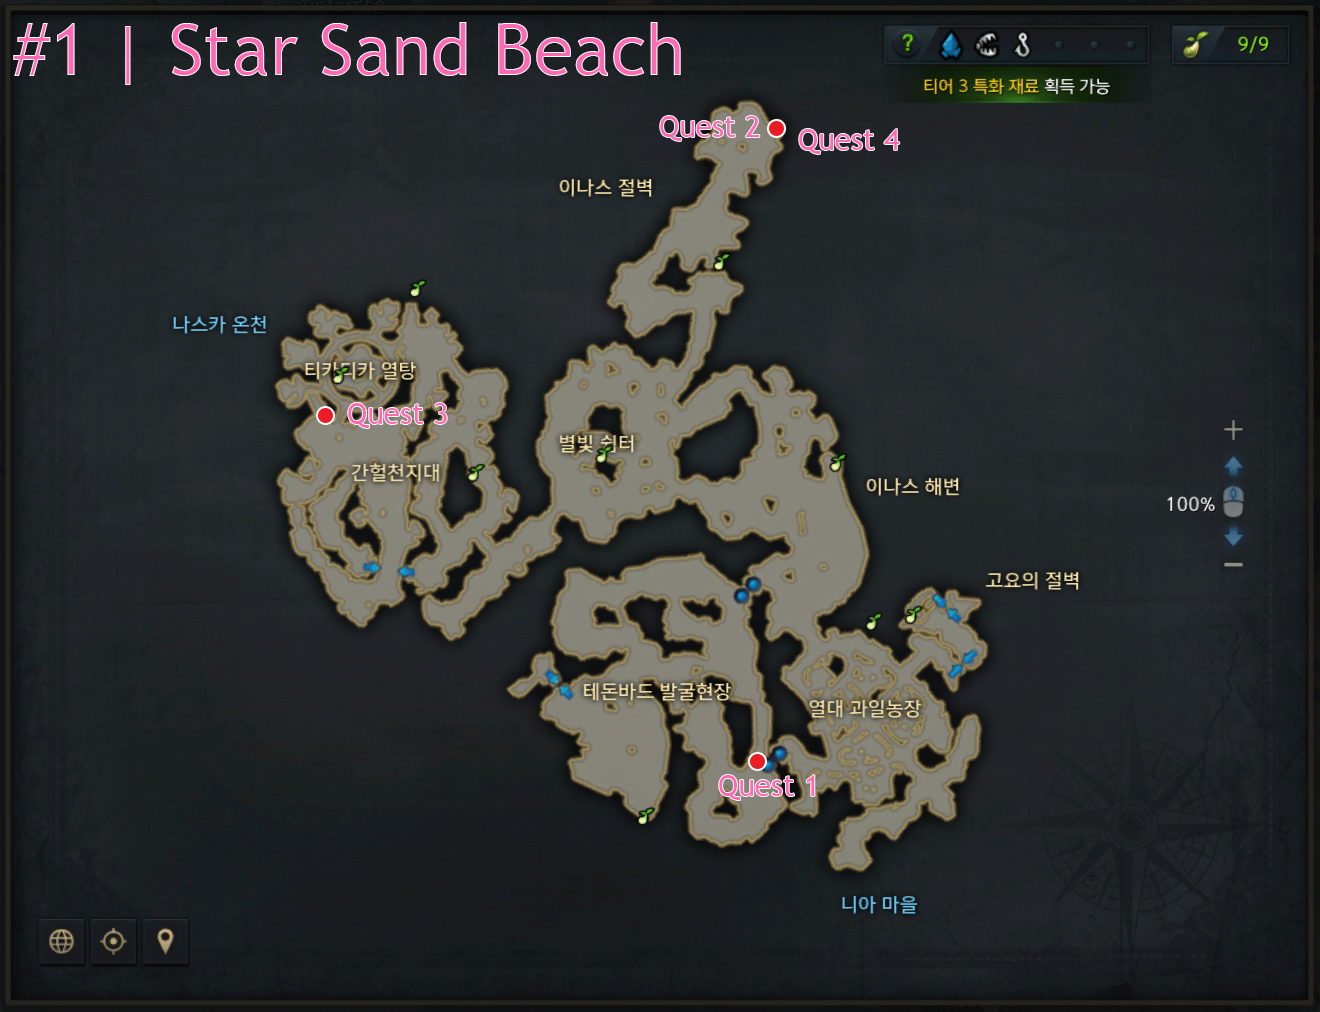
4/9/21 Update: Nukey#6505 has made adventure book maps for both Yorn and Papunika.


Spoiler: Never going to update this site myself again. There are infinitely better sites like lostarkcodex and inven.


Reasons:1. I don't play Lost Ark anymore and haven't for a long time. See you in Lost Ark NA.2. This is a shitty blog site and I regret ever using it. Their new editor is complete shit now after adobe flash was disabled.


If you want to fill in stuff that is missing or want me to edit outdated information, just DM me.

Posted by Yaen

Papunika Adventure Book

Food | Viewpoints | Monsters | Another Story | Hidden Story


Credit: Nukey#6505


Map names are specific to Russia server english patch


'Unsorted > Adventure Book Unsorted' 카테고리의 다른 글

Papunika Hidden Stories  (0) 2021.02.24
Papunika Another Story  (0) 2021.02.24
Papunika Monsters  (0) 2021.02.24
Papunika Viewpoints  (0) 2021.02.24
Papunika Food  (0) 2021.02.24
Posted by Yaen

'Unsorted > Adventure Book Unsorted' 카테고리의 다른 글

Papunika Adventure Book  (0) 2021.02.24
Papunika Another Story  (0) 2021.02.24
Papunika Monsters  (0) 2021.02.24
Papunika Viewpoints  (0) 2021.02.24
Papunika Food  (0) 2021.02.24
Posted by Yaen

'Unsorted > Adventure Book Unsorted' 카테고리의 다른 글

Papunika Adventure Book  (0) 2021.02.24
Papunika Hidden Stories  (0) 2021.02.24
Papunika Monsters  (0) 2021.02.24
Papunika Viewpoints  (0) 2021.02.24
Papunika Food  (0) 2021.02.24
Posted by Yaen

'Unsorted > Adventure Book Unsorted' 카테고리의 다른 글

Papunika Hidden Stories  (0) 2021.02.24
Papunika Another Story  (0) 2021.02.24
Papunika Viewpoints  (0) 2021.02.24
Papunika Food  (0) 2021.02.24
Yorn Monsters  (0) 2020.08.06
Posted by Yaen

Papunika Viewpoints

'Unsorted > Adventure Book Unsorted' 카테고리의 다른 글

Papunika Another Story  (0) 2021.02.24
Papunika Monsters  (0) 2021.02.24
Papunika Food  (0) 2021.02.24
Yorn Monsters  (0) 2020.08.06
Yorn Another Story  (0) 2020.08.04
Posted by Yaen

Papunika Food

'Unsorted > Adventure Book Unsorted' 카테고리의 다른 글

Papunika Monsters  (0) 2021.02.24
Papunika Viewpoints  (0) 2021.02.24
Yorn Monsters  (0) 2020.08.06
Yorn Another Story  (0) 2020.08.04
Payton Adventure Book Guide  (0) 2020.08.01
Posted by Yaen
Hildebrigne, Dream Palace Part 2 
  • This guide focuses on part 2 of this dungeon, focusing on the 2 Phases of Abrelshuld.

Abrelshuld Phase 1 Mechanic

  • Abrelshuld does this mechanic around 15 health bars and around 8 health bars.

  • After around 20 seconds, a target will appear around 1 person. After 4 seconds of the target appearing a meteor will fall down on the player's location.

  • Because of the rolling shit that occurs when the boss does this mechanic, it's easy to get knocked all the way to the end, failing the mechanic.

  • To ensure that you get the meteor off, make sure to use super armor skills, including your ult to avoid getting knocked away.

Abrelshuld Phase 2 Mechanic

  • Impair mechanic happens at 34 health bars and 26 health bars.

Something PUGs Will Fail (Including Me, I Suck)
  • This mechanic happens at 16 health bars.
  • One person receives a 10 second debuff. 3 players receive a buff with a light in front of them.
  • All 3 players must line up the shot with the debuffed person. Easiest way is to have the debuffed guy stand still. The buffed players should reset by running a short distance away, then click towards the direction of the debuffed player, bit by bit. Don't click on the player themselves.
  • After the 10 seconds are over, the buffed players fire a shot and no one is rooted. This allows you to dodge the incoming meteor.
  • To cheese, have a bard ult just before you get rooted. Alternatively, the players can run to the opposite side of the map and let the debuffed player die.
  • A similar mechanic happens at 8 health bars. This mechanic is much harder to line up for newer players.
  • Instead of the light being directly in front of the player, the light appears in a random direction to the 3 players.
  • The random directions are 12'o clock, 3'o clock, 6, and 9. Each player has a different direction.
  • Most players just choose to cheese this part. They let the one guy die to the meteor, while the other 3 run to the other side of the map like in the below video. I just didn't realize until after the run was over.
Abrelshuld Phase 2 Patterns
Out, then In
1 Orb Into 4
Rain
Imprison
Donut Spike
Lines
Rockets
X
Some Spike Cone Shit
Bomb
Cone
Some Spike Shit
Circle
Some Cone Shit
Some Curving Spike Shit


Posted by Yaen
Hildebrigne, Dream Palace Part 1 
  • This focuses on the first boss in this dungeon, which I'm just going to call Queen.

Queen Mechanic

  • At 8 health bars and 5 health bars, the queen will TP to the middle. Mirrors will spawn and a wave will spawn.

  • To survive the wave, you must choose the correct mirror. A colored mirror will connect to the same colored mirror. For example, a gold colored mirror will connect to a gold colored mirror.

  • The only trap mirror is the purple colored one. A purple mirror will lead to the boss. This is shown in the video.

Queen Patterns

Pizza

  • A cone will appear outwards with a safe area in the back of the boss.

  • Two rotating orbs will rotate clockwise or counterclockwise at the same time.

  • The safe area will go with the rotation of the rotating orbs.

  • In the below video, you see that both orbs rotate clockwise.

Dash Dash Dash Double Cone

Backstep Double Cone

Low Health Mechanic | Wave
3 Forward Orbs, Then Back

Low Health Mechanic | Red Orbs

  • A player receives a debuff on him for 5 seconds. In this video, it appears on the blaster.

  • After the debuff wears off, 8 orbs appear on the player and spread outwards.

Lurker Spikes

  • Hands up then spikes.

Bombs

Circle
Double Punch
Double Cone
Tri Cone
Quad Cone


Posted by Yaen
Corridor of the Twisted Lord 
  • This guide will focus on the mechanics of each boss first, since most readers only watch mechanics anyway.

  • The patterns and telegraphs of each boss will come after.

Bishop and Rook Mechanic

  • Both the bishop and the rook should be killed at nearly the same time. Once one of them dies, the other will enrage. 

  • At around 8 health bars or so, a target will appear on a party member.
  • The rook will move to one side. You must move near the bishop on the opposite side.
  • The rook will fire a projectile and this projectile must hit the bishop or the party will wipe. 
  • At around 5 health bars, the mechanic happens again but differs slightly.
  • 8 rook columns spawn that you must break to clear the way for the projectile.

Monghwan Mechanic

Eat

  • This mechanic happens at 15 health bars and 5 health bars.
  • Monghwan will TP to the middle. Players should go to 4 positions, north, east, south, west.
  • 4 swords will spawn directly from Monghwan in the center. Each will follow a player.
  • Only 1 player should take it at a time. After the 1st player takes the sword, everyone will gain a sword of illusion debuff. This wears off after 1 second. The 2nd player ONLY eats the 2nd sword AFTER THE DEBUFF WEARS OFF. If you eat the sword while you still have the debuff, you die.
  • At the same time, you must also impair the boss in the middle. If you're not fast enough, party wipes.
  • Run clockwise or counterclockwise, it doesn't matter, just coordinate which direction with your group.

Impair

  • Alternating cone AoEs.

Monghwan Patterns

Hii-yah Hii-yah Cone
Teleport Jump Jump Jump Cone

Some Ninja Shuriken Shit

Some True Ninja Shit
Rain

Bishop Patterns

Alternating X

Laser

  • Low health mechanic.
  • Up, down, left, right, southwest, northeast, northwest, southeast.

Some Random Orb Shit

Line
Four Orbs
Diamond

Bishop Patterns

Slam
Knock Back
Charge


Posted by Yaen

블로그 이미지
Yaen
Yesterday
Today
Total

최근에 올라온 글